
How to create a story board
How to Create a Story Board
Explaining to a production team a concept that you have for a video for your business can be a challenge. That’s where a storyboard can prove so beneficial. A storyboard is a useful tool that you can use to sketch out how the video will be delivered, screen by screen. It is very similar to a comic strip. Each square in your storyboard will represent a different screen and will show who will appear in the scene, what is being said and what text and/or graphics will appear in the screen. As you read through each section in the storyboard you should be able to follow the video as it unfolds.
Storyboards are incredibly valuable in the creative process and they serve two important purposes. Firstly, they assist with planning and secondly, they help with delivery.
When you create a storyboard for video content you are essentially developing a plan for your video production. Many people will simply start recording but without a clearly defined strategy you will waste time and resources developing unnecessary and unwanted recordings. A storyboard enables you to clearly visualise the shots that you need and put them into a logical sequence, bringing in any visuals or interactivity to complement the script. It is much easier to edit and rework screens on paper than it is to re-take video on the day. A storyboard can also facilitate the delivery of the project because you can show the production company exactly what you are thinking about in a clear and concise way. Storyboards are flexible documents because they can adapt as the project goals change or if you want to incorporate something new.
Creating a Storyboard Step By Step
A storyboard can be as simple or as complex as you would like, but it must be understandable to your video producer. Before you start to put your storyboard together, think about the content of your video. Will you or any of your team be featured in the video or will it feature more animations and graphics than actual people? The context of your video is important because a video taken with your team will require a different approach to one that is produced incorporating graphics and animations. Creating a storyboard is easy and can be achieved in a few simple steps:
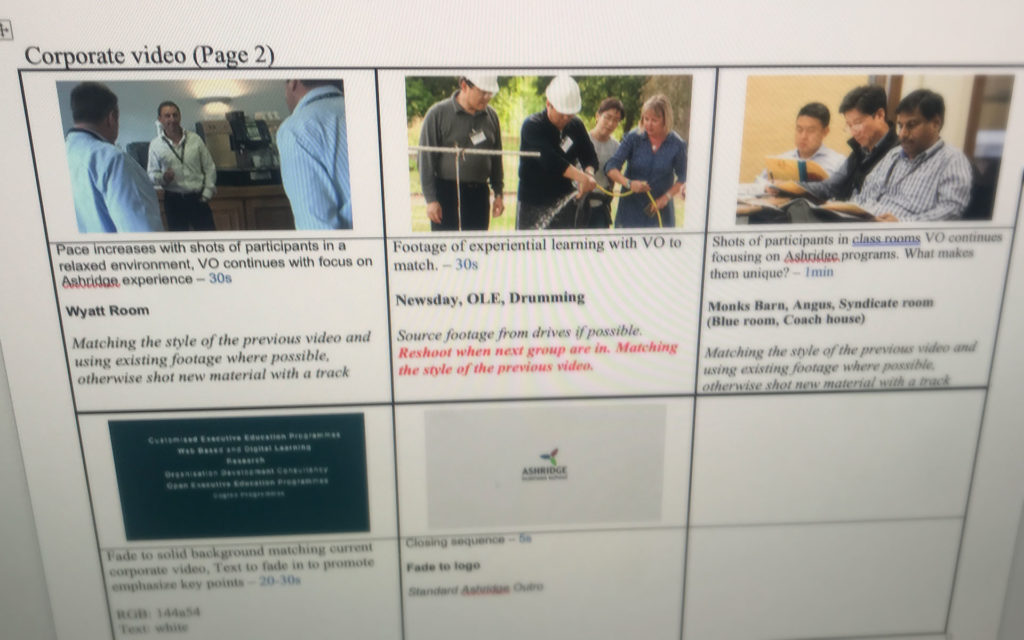
Step 1 A Template
Take a sheet of A4 paper or a blank word document and measure out some rectangles on the page, between four and six should be enough. You need the boxes to be large enough to fit some basic sketches and notes in. If you prefer there are lots of storyboard templates that you can download for free to get you started and you can then start to build your own as you develop confidence.
Step 2 Create the Script
For your storyboard you will need at the very least a draft script. Some businesses create the script themselves while others prefer to commission a professional writer to develop the content. When the script has been created it is important that it is effectively incorporated into each of the screens on the page. During the storyboard development process, you will need to decide how to structure your script and how much you will say on each screen. As you start to add the script you are beginning to pull together the main components of your storyboard.
Step 3 Add Visuals
This is where you can be as creative as you want to be. Using a variety of creative devices, sketch out each scene. Movement can be highlighted with arrows. Stick figures will work just as well as an elaborate drawing so don’t worry if your drawing skills are not the best. Visuals are important because they can really bring your content to life. Whether you are delivering the content as a video or it is being created through animation or other graphics, deciding what visuals you want to include and how they will appear is important. If you would prefer to use other creative devices you can create a collage using images from a magazine or collected from a variety of sources. There are also storyboard tools online where you can create really impressive storyboards with characters, scenes and more.
Step 4 Annotate
By this stage you will have the most of your storyboard created and the fourth step is to add the finishing touches. Work through each of the rectangles and add in some notes about each screen. You may want to include a brief outline of what will happen in the screen, if you would like to incorporate any special effects, transitions or camera angles. Also use your annotations to identify what music and/or sound you would like incorporating into the screen.
Top Storyboard Tips
A storyboard doesn’t have to be perfect, and it certainly doesn’t need to be anything elaborate. Don’t spend too much time working on them. Be creative and get your ideas onto paper. Have fun with them and put your imagination to work.
When creating storyboards, number your rectangles so it’s easy to follow and can be easily referenced during discussions with your video production company
Before creating the final storyboard, rearrange the squares and see how creative you can be with the storyboard
Create a master shoot list to make sure that nothing is overlooked
Keep the storyboard simple so it can be easily understood
Make sure you share your storyboard with your video production team
Producing a storyboard is a creative and collaborative process that should involve the people who will be delivering the content. For corporate videos or training in particular, storyboards are crucial so that you can create a logical and structured video and it incorporates all of the elements that you need such as sound effects, music, graphics and animations. An effective storyboard will increase the quality of the final video and reduce the number of re-takes, saving time and resources.
Are you ready to succeed with great video production?
SQUARE PIXEL PRODUCTIONS
matt@squarepixelproductions.co.uk
07814671418
Three Gables
Cornerhall
Hemel Hempstead
Hertfordshire
HP3 9HN
STARTING A PROJECT
Get in touch to see how we can help.
Copyright © 2020 Square Pixel Productions Limited